Sunday, 4 June 2023

Mathematics of Origami: Flat-Folding

                 Mathematics of Origami

Think about it, mathematics combined with the art of origami. Well, it's a real thing! The discipline of origami or paper folding has received a considerable amount of mathematical study. Fields of interest include a given paper's flat-foldability( whether the paper model can be flattened without damaging it), and the use of paper folding to solve cubic equations. Well, in this last post of the blog on origami, let's dive into the mathematics of flat- folding.

-----> FLAT-FOLDING
The construction of origami models is sometimes displayed as crease patterns. The major question about such creases is whether a given crease pattern can be folded to a flat model, and if so, how to fold them; this is known as an NP-Complete Problem. There are 3 mathematical rules for producing flat-foldable crease patterns:

1. MAEKAWA'S THEOREM:  At any vertex, the number of valley folds and mountain folds always differ by 2.  Every vertex has an even number of creases,  and therefore also the region between the creases can be colored with 2 colors.
 In this one-vertex crease pattern, the number of mountain folds( the 5 folds with colored side out) differs by 2 from the number of valley folds(the 3 folds with white side out).

Paper exhibits zero Gaussian curvature at all points on its surface, and only folds naturally along lines of zero curvature. Curved surfaces that can't be flattened can be produced using a non-folded crease in the paper, as it is easily done with wet paper or your fingernail.

2. KAWASAKI'S THEOREM: Also known as the Kawasaki-Justin theorem, it states that the crease pattern is flatly foldable only if adding and subtracting the angles of consecutive folds around the vertex, alternatingly, gives an alternating sum of 0. Crease patterns with more than 1 vertex do not obey such a criterion and are NP-Hard to fold. This theorem is named after one of its discoverers, Toshikazu Kawasaki, who is popular for his origami roses and more amazing work. Jacques Justin and Koji Husimi also contributed.

In this example, the alternating sum of angles( clockwise from the bottom) is 90°- 45° + 22.5° - 22.5° + 45° - 90° + 22.5° - 22.5°= 0° . Since it sums up to 0, the crease pattern is flatly foldable.


Saturday, 3 June 2023

Yoshizawa-Randlett System: Origami Bases

                    Yoshizawa-Randlett System

                             All about ORIGAMI BASES

In origami, there are several origami bases on which we fold our models. The ones listed below are accepted as traditional origami bases. Let's dive into the details now:

THE BLINTZ BASE: You start with a square of paper. Make diagonal creases on the square by bringing the opposite points together. When the creases are made, unfold, and then bring the 4 corners together at the intersection of the diagonals, the center. Your Blintz base is now complete! The resulting square will have more points available for folding. Go on, practice!

THE KITE BASE: As the name implies, the base looks like a kite. Begin with a square of paper. Make a diagonal crease by bringing 2 opposite corners together. Unfold. Then position the paper such that the crease looks vertical. Now bring the 2 side edges to the crease, aligning the folds properly. Your Kite base is ready!

The FISH BASE: You start with a square of paper. You make a diagonal crease on the square, joining two opposite corners. From then, you make two rabbit ear folds, along the crease. That's it, the fish base is complete.

THE WATERBOMB BASE: This consists of two perpendicular valley folds down the diagonals of the square and two perpendicular mountain folds down the center of the square. This crease pattern is then compressed to form the waterbomb base, which is an isosceles-right triangle with four isosceles-right triangular flaps. The waterbomb base is an inside-out preliminary fold, or the square base.

THE SQUARE BASE: Otherwise known as the preliminary fold, this consists of two perpendicular diagonal mountain folds that bisect the corners of the square and two perpendicular valley folds that bisect the edges of the square. The paper is then collapsed to form a square shape with four isosceles-right triangular flaps. It is also called the Square Base.

THE BIRD BASE/ CRANE BASE: You fold the square base, then make petal folds on both sides, back and front, facing upwards. The Bird Base is complete! The traditional origami crane is folded using this base.

THE FISH BASE

WATERBOMB BASE. This is the down view.

THE BIRD BASE

KITE BASE

SQUARE BASE( Preliminary fold)

 BLINTZ BASE


Yoshizawa-Randlett System: Compound Folds

              Yoshizawa-Randlett System

                                 COMPOUND FOLDS

Here, let's talk about the compound folds in origami, with the Yoshizawa-Randlett System.

SQUASH FOLD: A squash fold starts with a flap with at least 2 layers( like in the waterbomb base). Make a radial fold from the closed point down the flap. Open the flap as it was and refold down to make two adjacent flaps.

RABBIT EAR: A rabbit ear fold starts with a reference crease down a diagonal of the paper. Make two radial folds from opposite corners along the same side of the reference crease; the resulting flap should be folded flat and down so that the previous edges align.

THE PETAL FOLD: This starts with two connected flaps, each of which has at least two layers( for example, two flaps of a preliminary base, or two flaps of a square base). The two flaps are attached to each other with a reference crease. Make two radial folds from the open point, so that the open edges lie along the reference crease. Unfold these two radial folds. Make another fold across the top connecting the ends of the creases to create a triangle of creases. Unfold this fold as well. Fold one layer of the open point upward and flatten it using the existing creases. A petal fold is equivalent to two side-by-side rabbit ears, which are connected along the reference crease. Yes, the petal fold is involved during the making of an origami crane.

The SQUASH FOLD on a flap of the waterbomb base. The dotted structure shows the position of the flap earlier.

RABBIT EAR FOLD. The dotted line is the reference crease.

THE PETAL FOLD. The dotted line shows the reference crease, the base on which the fold is being made is the square base. 


Friday, 2 June 2023

Yoshizawa-Randlett System: Common Operations

                   Yoshizawa-Randlett System

                                            COMMON OPERATIONS

In this section, let's talk about some common operations in origami, with the diagrams in the Yoshizawa-Randlett System. These all are fairly easy, some of them might be a bit tricky. The pleat folds and reverse folds are often done with the two creases at an angle. Reverse folds of a corner are typically used to produce feet or bird heads.

The sink fold is considered intermediate to high skill. The version in the images below is called an open sink. There is another version called a closed sink which generates a triangular pocket with no flaps showing. In simple cases, the model can be partly unfolded and then folded with the sink in place. Now what I want you to do is:

-------> Grab a square of paper.
-------> Get seated at a comfortable place. My friend, do fold on a flat surface!
-------> Follow the instructions given in the images below. Start practicing! Remember, the dashed line- valley folds, the dashed and dotted line- mountain folds!
INSIDE CRIMP

OUTSIDE CRIMP

INFLATE. Note that this is a waterbomb design, fold that first!

INSIDE REVERSE FOLD

OPEN. Remember to follow the valley and mountain folds!

OUTSIDE REVERSE FOLD

PULL. Guess which fold is this. If you guessed the fold, pleat, you are correct!
BRING THE POINTS TOGETHER.

REPEAT. The arrows in sequence from up to down show repetition, one, two, and three times.

ROTATE

OPEN SINK

PLEAT FOLD, ALSO CALLED ACCORDION FOLD


Yoshizawa-Randlett System

                     Yoshizawa-Randlett System

                                         SECTION OF BASIC FOLDS

So, you want to make an origami model. And you want the instructions, step-by-step, explaining each and every fold. How to go about it? Well, you need to use a diagramming system. The Yoshizawa-Randlett System is one such system that describes the folds of origami models. Most origami books begin with an illustration of basic origami techniques used to create models. There are several typical origami bases on which we fold our models.

Akira Yoshizawa, the Grandmaster of Origami, and Samuel Randlett, along with contribution of Robert Harbin, developed this diagramming system in the 1950s and 60s. It was then recognized as the default, the standard system by the international origami community, and is still in general use today.

Lines and arrows are the two main types of origami symbols. Arrows show how the paper is moved, or bent, and the lines show various types of edges:

-------> A thick line shows the edge of the paper.
-------> A dashed line shows a valley fold, which means the paper is folded in front of itself. And yeah, it looks like a valley.
-------> A dashed and dotted line shows a mountain fold,  which means the paper is folded behind itself.
-------> A thin line shows where a previous fold has creased the paper.
-------> A dotted line shows a fold that's hidden behind other paper or sometimes shows a fold that has not been made.

VALLEY FOLDVALLEY FOLD

MOUNTAIN FOLDMOUNTAIN FOLD

VALLEY FOLD, TURN OVER

TURN OVER, INVISIBLE LINE


Wednesday, 31 May 2023

Types of Origami

                        TYPES OF ORIGAMI

Origami has different types as well, and it's a great thing. In fact, folding paper counts as the art of origami, regardless of culture and origin. Now let's check out the different types of origami:


1. ACTION ORIGAMI: This kind of origami can be animated. For example, the flapping bird( crane ) is a part of action origami. Models in which the final assembly includes blowing up a water bomb, are also classified as action origami. Action origami toys are meant to amuse, but some are designed to inspire wonder. Basically, if an origami model requires some sort of action, such as pulling, inflating, rolling, and more, for the enhancement of the final creation, it can very well be considered a part of action origami. Some examples of action origami are the Jumping Frog and the traditional origami crane.

  The Jumping Frog


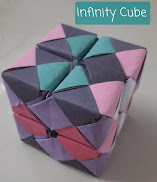
2. MODULAR ORIGAMI: The kind of origami in which you use two or more sheets of paper and join them using origami techniques to create a much larger model is called modular origami. One can also term this unit origami because several units of paper are joined together to form a complete model. Each piece of paper is folded into a unit of a particular model, then several of them are made and inserted into one another through flaps or pockets. These insertions create friction/tension that holds the model tight. Check out this beautiful swan and this Infinity Cube I made while watching the instructions in a video on YouTube:


3. ORIGAMI TESSELLATIONS: A tessellation is a collection of figures filling a plane without any overlaps or gaps. In origami, pleats are used to connect molecules such as twist folds together in a repeating fashion. What is a pleat? Well, you remember that paper fan we used to make in our childhood? That's called a pleat. You can call a tessellation, a pattern, perhaps. Some examples of tessellations are given below:


4. KIRIGAMI: Kirigami is a variation of origami. It is a Japanese term for paper cutting. In Kirigami, you fold the paper, as well as cut the paper, resulting in a beautiful 3D design that stands away from the paper. Typically, Kirigami starts with a folded design, which is then unfolded, after which we cut the paper at the specific creases for the model to stand out to get the finished creation. One can get to see symmetry at its best in Kirigami models! An example of kirigami is as follows:


Tuesday, 30 May 2023

The Story of Sadako Sasaki

                   The Story of Sadako Sasaki

Sadako Sasaki was a Japanese girl who became a victim of the atomic bombings of Hiroshima and Nagasaki during World War II. She was only two years old when the bombs were dropped. She is remembered through the story of the more than one thousand origami cranes she folded before her death. She died, at the age of 12, on October 25, 1955, at the Hiroshima Red Cross Hospital.

On the fateful day of the bombing of Hiroshima, Sadako was at home, about 1.6 km away from ground zero. She was blown out the window and her mother ran out to find her, suspecting she may be dead. Instead, she found her alive with no apparent injuries. While they were fleeing, Sadako and her mother were caught in black rain. Her grandmother ran back inside and died near the house, apparently trying to escape fires by hiding in a cistern.

Sadako grew up like her peers, becoming an important class relay race team member. In November 1954, Sadako developed swellings on her neck and behind her ears. In January 1955, purpura had formed on her legs. Subsequently, she was diagnosed with acute malignant lymph gland leukemia. She was hospitalized on February 21, 1955, and given no more than a year to live. She was admitted as a patient to the Hiroshima Red Cross Hospital for treatment and given blood transfusions on February 21, 1955. When she was admitted, her white blood cell count was six times higher than the average child's.

In August 1955, she was moved into a room with a girl named Kiyo, a junior high school student who was 2 years older than her. Shortly after, beautiful origami cranes were brought to her home from a local high school club. Chizuke Hamamoto, Sasaki's friend, narrated the legend of the origami cranes to her. Determined, she set a goal that she would fold 1,000 of them, which was believed to grant the folder a wish. Although she had plenty of free time during her days in the hospital, Sasaki lacked paper, so she used medicine wrappings and whatever else she could scrounge; including going to other patients' rooms to ask for the paper from their get-well presents. Her best friend, Chizuko, also brought paper from school for Sasaki to use.

A popular version of the story is that Sasaki fell short of her goal of folding 1,000 cranes, having folded only 644 before her death, and that her friends completed the 1,000 and buried them all with her. (This comes from the novelized version of her life, Sadako and the Thousand Paper Cranes.) However, an exhibit that appeared in the Hiroshima Peace Memorial Museum stated that by the end of August 1955, Sasaki had achieved her goal and continued to fold 300 more cranes. Sadako's older brother, Masahiro Sasaki, says in his book The Complete Story of Sadako Sasaki that she exceeded her goal.

Sadako Sasaki has become an international symbol of peace and a peaceful world. Sasaki is a heroine for many Japanese girls. Japanese children fold the classic, yet intriguing origami crane in memory of Sadako. Dedicated to Sasaki, people all over Japan celebrate the 6th of August as the Annual Peace Day.

Statue of Sadako Sasaki
 in Peace Park, Seattle, Washington


Mathematics of Origami: Flat-Folding

                  Mathematics of Origami Think about it, mathematics combined with the art of origami. Well, it's a real thing! The disc...